Transform Your Space: A Comprehensive Guide to Overlay Carriage House Installation

Overlay carriage house installation can completely transform your space by combining classic design with modern function. These upgrades enhance curb appeal, depth, and add character to your home. Whether your house is traditional or contemporary, this option blends beautifully while standing out. It adds lasting value and charm, making your home look more elegant and refined. This guide covers everything you need to get started, including planning, material selection, and a complete breakdown of the installation process. Whether you want to tackle it yourself or hire a pro, we make each step easy to understand. Start your journey toward a more beautiful and functional space with expert-backed guidance you can trust. Benefits of Overlay Carriage Houses Overlay carriage house installation adds both charm and value to your home. Here are the main benefits homeowners can enjoy when choosing this stylish upgrade: Boosts Curb Appeal Instantly Overlay carriage house doors give your home a classic, upgraded look that stands out and blends well with both modern and traditional architectural styles. Increases Property Value A carriage-style garage door makes your home look more polished, helping boost its overall value and attracting more attention from potential buyers. Custom Design Options These doors come in various finishes, hardware, and window styles. You can match the door perfectly with your home’s personal design theme. Extra Functionality Unlike plain garage doors, overlay models offer added features such as windows, storage space, and better design choices to fit your daily lifestyle needs. Improves Energy Efficiency Many overlay carriage doors include insulation and weather seals that help regulate indoor temperatures and cut down your monthly heating or cooling costs. Durable and Long-Lasting Built with strong materials like steel or composite wood, these garage doors are designed to withstand harsh outdoor weather conditions and last for a long time. Fits Any Home Style Whether your home is traditional or modern, there’s a perfect overlay design that blends in while adding a unique, attractive visual touch. Choosing an overlay carriage house installation is a smart move for homeowners who want better looks, function, and efficiency in one upgrade. It’s an investment that truly pays off. Key Features of Overlay Carriage Houses Overlay carriage house installation gives your home more than just good looks. Let’s check out the key features that make these garage doors worth the upgrade. 1. Custom Design Choices Overlay carriage-style garage doors are available in a variety of designs, colors, and textures, allowing you to match them to your home’s look and style perfectly. 2. Modern Locking Systems Advanced locking features give better home security. These garage doors often include heavy-duty locks or smart locks for added safety and peace of mind. 3. Automated Openers Many overlay carriage house doors support automation, allowing you to open or close your garage easily using a remote, smartphone, or smart home system. 4. Strong Build Quality They are made using steel, composite, or durable wood materials. These high-quality garage doors are designed to withstand the wear and tear of everyday use. 5. Weather-Resistant Materials Materials such as insulated steel or treated wood protect the door from moisture, sunlight, and wind, helping your garage door withstand any season. 6. Decorative Hardware Options You can add stylish hardware like handles, hinges, and straps. These details make the garage door look more classic and eye-catching without much effort. 7. Fits Any Home Design From modern homes to older builds, overlay carriage house garage doors can be tailored to blend in and still give your space a fresh update. Overlay carriage house installation offers strong, stylish, and secure features that cater to today’s home needs. It’s a smart way to get both looks and function in one upgrade. Planning Your Overlay Carriage House Installation Proper planning is crucial for a successful overlay carriage house installation. The first step involves assessing the available space and determining the size and style of the carriage house that best fits the property. Considerations should include the surrounding architecture, local zoning regulations, and personal preferences. Once the initial assessment is complete, it’s time to move on to design considerations. This includes selecting the type of doors, windows, and additional features you wish to incorporate. Working with a designer or using design software can help visualize the final result and make necessary adjustments before construction begins. Setting a clear budget is an important part of the planning process. It’s essential to account for all potential costs, including materials, labor, permits, and unforeseen expenses. A detailed budget helps avoid financial surprises and ensures the project stays on track from start to finish. Materials Needed for Overlay Carriage House Installation Choosing the right materials is key to a successful overlay carriage house installation. It affects the appearance, durability, and maintenance of the final design. Common options include: Choose materials that suit your local weather, personal style, and available budget. Partner with reliable suppliers to ensure the right match for your project. Additionally, select high-quality hardware to enhance the appearance, functionality, and security of your overlay carriage house. Step-by-Step Guide to Installing Overlay Carriage Houses Installing an overlay carriage house involves several steps, each requiring attention to detail and precision. Here’s a comprehensive guide to the installation process: Step 1. Preparation Clear the area where the carriage house will be installed. Ensure the foundation is level and any previous structures are removed or modified if necessary. Step 2. Framing Build the carriage house frame using the materials you’ve chosen for your project. This step includes taking precise measurements and trimming materials to match the design requirements. Step 3. Door Installation Install the doors carefully, making sure they are aligned properly and can open and close without issues. This step may involve installing tracks or hinges, depending on the chosen door style. Step 4. Adding Windows If windows are part of the design, they should be installed after the doors. Ensure they are tightly sealed to prevent any water from entering. Step 5. Finishing Touches Add any decorative elements, such as trim, hardware,
Master Linear Garage Opener Programming with These Simple Steps

A reliable garage door opener makes daily life easier and more secure. If you own a Linear model, learning the process of Linear garage opener programming ensures your door opens and closes smoothly every time. Proper programming helps avoid issues, improves security, and keeps your garage system functioning exactly as it should. This detailed guide provides simple step-by-step instructions to help you complete the setup without confusion. With the right approach and accurate information, you can handle programming quickly and confidently. Follow this guide to achieve dependable garage door performance while saving time and avoiding unnecessary service calls. Understand Your Linear Garage Opener System Understanding how your Linear garage opener system works is the first step before programming it. These openers are known for their smooth performance and easy-to-use design. They usually include a motor unit, a remote control, a wall button, and safety sensors that all work together during operation. Most Linear garage openers follow a similar setup process. Locate the programming button on the motor unit and make sure your system is installed correctly. Before starting, check that the garage door is closed and the area is well-lit for a safe and hassle-free programming experience. Every part of the garage opener system plays a role in syncing the remote. The remote sends a signal to the receiver in the opener, allowing the door to move. Learning this connection helps you handle Linear garage opener programming confidently without missing important steps. Get Prepared: What You Need Before Programming Before starting the Linear garage opener programming process, getting everything ready will help things go smoothly. A little preparation can save time and prevent mistakes during setup. 1. Find the Instruction Manual Use the printed guide or download one based on your opener’s model number. This gives you accurate steps for your specific unit. 2. Have a Sturdy Ladder Most opener units are mounted on the ceiling, so you will need safe access to reach the programming button on the motor. 3. Check Your Remote Control Make sure the remote is working. Replace the batteries if the signal seems weak to avoid connection issues during the setup. 4. Clear Your Workspace Remove anything around the garage door area. A clean and safe space lets you move freely and focus on the task. 5. Inspect The Opener Unit Confirm the power is on and check the indicator lights. These signs tell you the system is ready for the programming steps ahead. Once you’re ready, programming will go smoothly. A little preparation helps prevent errors and keeps your Linear garage opener running properly. Step-by-Step Linear Garage Opener Programming Process Getting your Linear garage opener working right depends on following the correct steps. These simple actions help you complete the linear garage opener programming quickly and without issues. Step 1. Find the “Learn” or “Program” Button on the Opener Look for a button labeled “Learn” or “Program” near the LED light on the opener unit. This starts the programming process. Step 2. Press and Release the Programming Button Press the button once and let go. The LED light will blink, showing the opener is now ready to connect with your remote. Step 3. Press the Remote Button Within 30 Seconds After the opener light blinks, press the remote button you want to link. Do this within 30 seconds, or the system will exit programming mode. Step 4. Watch for a Flash or Click to Confirm If the opener light flashes again or you hear a soft click, that means your remote and opener are now successfully connected and ready. Step 5. Test the Remote to Make Sure It Works Press the same remote button to see if the door opens or closes. If it does not respond, repeat the steps and check the remote batteries. Step 6. Wait Between Button Presses During Setup Don’t rush the process. Allow a short pause between each step so the opener system has time to register each signal without confusion. Step 7. Avoid Pressing Multiple Buttons at Once Stick to one button at a time while programming. This keeps the signals clean and helps prevent errors during the syncing process. Once the remote is synced, your garage door should respond smoothly. Taking your time and following these steps will ensure a successful setup every time. Programming Multiple Remotes or Keypads Programming more than one remote or keypad is easy with the right steps. This part of linear garage opener programming helps families or shared spaces stay connected without hassle. 1. Program the First Remote as Usual Start by following the basic steps to sync your first remote. Press the Learn button, then the remote button, and wait for confirmation from the light. 2. Press the Learn Button Again to Add Another Device Go back to the opener unit and press the Learn button again. This prepares the system to store a second remote or wireless keypad. 3. Sync the Second Remote or Keypad Code Within 30 seconds, press the second remote’s button or type your keypad code. Then press Enter. The flashing light or click confirms it’s programmed. 4. Repeat for Any Extra Devices You Need You can repeat the process to add more remotes or keypads. Just press Learn again before syncing each one so nothing gets erased. 5. Clear All Devices If Needed To erase all saved codes, press and hold the Learn button for about 6 to 10 seconds until the LED turns off completely. This makes it easy to program different remotes and keypads for each family member. It’s a simple way to keep access flexible and secure for everyone. Troubleshooting Programming Issues Even if you follow the steps right, sometimes things don’t go as planned. These common problems can affect your garage opener setup and how it responds. Maintaining Your Linear Garage Opener Routine maintenance of your Linear opener helps it run better and last longer. These easy steps can prevent problems and make future programming much smoother. 1. Lubricate the Chain
How to Reattach Garage Door Cable: Expert Tips for Quick Repair
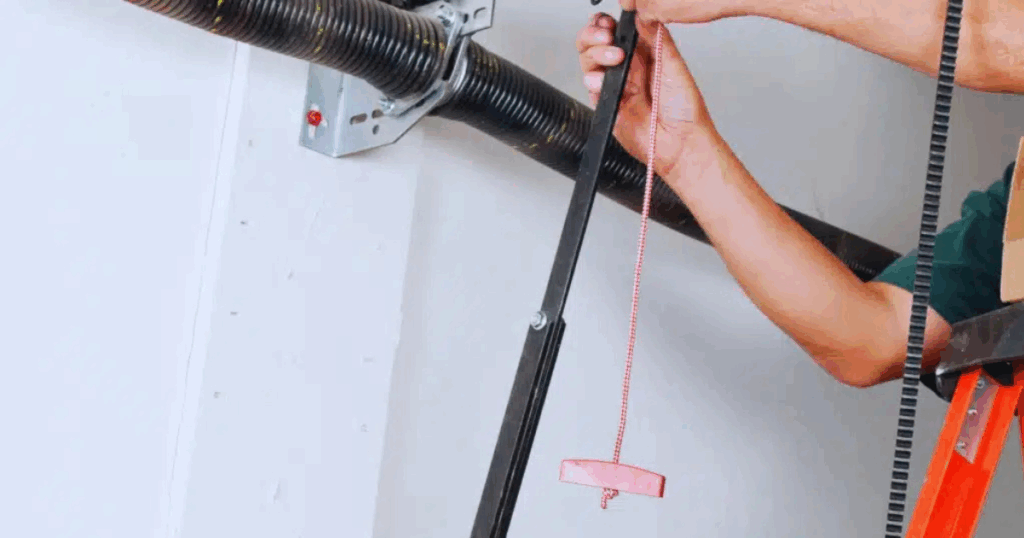
When you’re looking to learn how to reattach garage door cable, it’s crucial to approach the task with care and attention. Cables can become loose or disconnected due to wear, impact, or improper adjustments. By understanding the process, you can ensure safety and efficiency, preventing additional issues that could further damage the garage door system. Garage doors are vital for home security and daily convenience, so any malfunction can be a major disruption. A detached cable often indicates an underlying issue, but reattaching it correctly can restore the door’s smooth operation. With the right tools and following a detailed step-by-step process, you can confidently fix the problem and protect your home. Understanding Garage Door Cables Garage door cables are crucial components that help lift and lower the door smoothly. They work together with the springs to evenly distribute the door’s weight, ensuring smooth and efficient operation. Understanding their function can aid in diagnosing issues and implementing reattachments properly. These cables are typically made of strong, high-tensile steel, designed to withstand the door’s weight and the forces exerted during operation. They run through a system of pulleys and drums, connecting to the bottom brackets of the garage door. Knowing the layout and function of these cables is key to effective maintenance and repair. Wear and tear over time can lead to cable detachment or damage. Common signs of cable issues include uneven door operation, visible fraying, or a door that is difficult to open or close. Regular inspection can help identify potential problems early, reducing the risk of sudden failures. Common Reasons for Cable Detachment Several factors can cause garage door cables to detach. Understanding these causes can help in preventive maintenance and timely garage door repairs. Here are some common reasons: By identifying these causes, homeowners can implement measures to prevent detachment and ensure the longevity of their garage door cables. Safety Precautions Before Starting the Repair When handling garage door cables, safety should always be the highest priority. The tension in these cables can be dangerous, and proper precautions must be taken. Here are some essential safety tips: 1. Disconnect Power Be sure to disconnect the garage door opener from the power source before beginning the repair. This ensures the door won’t accidentally activate while you’re working, preventing unexpected movements. 2. Use Protective Gear Wear safety glasses and gloves during the repair. This protects you from potential injuries caused by snapping cables or falling debris that might occur. 3. Secure the Door Before beginning, make sure the garage door is fully closed and locked. This will keep it from moving unexpectedly, reducing the risk of injury. 4. Use Caution with Springs Garage door springs are tightly wound and can pose a serious risk if not handled properly. Handle them carefully and avoid unnecessary pressure to prevent injury or damage to the system. 5. Have a Partner If possible, have someone help you during the repair. A partner can assist with tools, support, and managing tasks, ensuring the repair goes smoothly and safely. By following these safety measures, the risk of injury can be significantly reduced, allowing for a safe and effective garage door repair process. Tools Required for Reattaching Garage Door Cables It’s essential to have the proper tools available to reattach garage door cables effectively. Here is a list of tools commonly needed for this task: Having these tools ready allows you to approach the repair with both confidence and accuracy. Step-by-Step Guide on How to Reattach Garage Door Cable Reattaching a garage door cable may seem tricky, but with the right steps, it can be done safely and effectively. Here’s an easy guide to ensure you complete the task correctly. Step 1. Identify the Problem Start by inspecting the garage door system to find where the cable has detached. Look for any visible damage, such as worn-out cables or broken pulleys, that may need attention. Step 2. Secure the Door Before you begin, make sure the door is fully closed and locked in place. Use clamps or locking pliers to secure the door, preventing any unexpected movement while you’re working. Step 3. Release Tension Release the tension in the springs carefully using a winding bar or similar tool. This step is crucial to avoid injury and ensure the system is safe to work with during the repair. Step 4. Reattach the Cable Guide the cable through the pulleys and firmly secure it to the bottom bracket. Make sure it’s seated properly in the drum, and ensure it’s tightly in place to avoid future issues. Step 5. Tighten and Test Once the cable is reattached, reapply tension to the springs and carefully test the door’s movement. Make sure the door moves smoothly and is properly balanced, which shows the cable has been installed correctly. Reattaching a garage door cable demands careful attention and patience to guarantee it operates safely and efficiently. By following this step-by-step guide on how to reattach garage door cable, you will have your garage door operating like new in no time. Troubleshooting Common Issues During Repair During the garage door repair process, you may encounter some common issues. Here are solutions to address these challenges: Tackling these problems quickly can help avoid additional damage and keep the garage door running smoothly. Preventative Maintenance Tips for Garage Door Cables Regular maintenance is key to keeping your garage door cables in top shape. Proper care can help extend their lifespan and prevent unexpected detachment. Here’s how you can maintain your garage door cables effectively. 1. Inspect Regularly Check cables for wear, fraying, or damage. Replace them immediately to prevent further damage and ensure your garage door system operates smoothly. 2. Lubricate Moving Parts Use silicone-based lubricant on pulleys, hinges, and springs. This reduces friction, prevents wear, and ensures smooth, quiet operation of your garage door. 3. Balance the Door Disconnect the opener and manually operate the door to check the balance. If it moves unevenly, it may need adjustment to avoid strain on the cables.