Transform Your Space: A Comprehensive Guide to Overlay Carriage House Installation

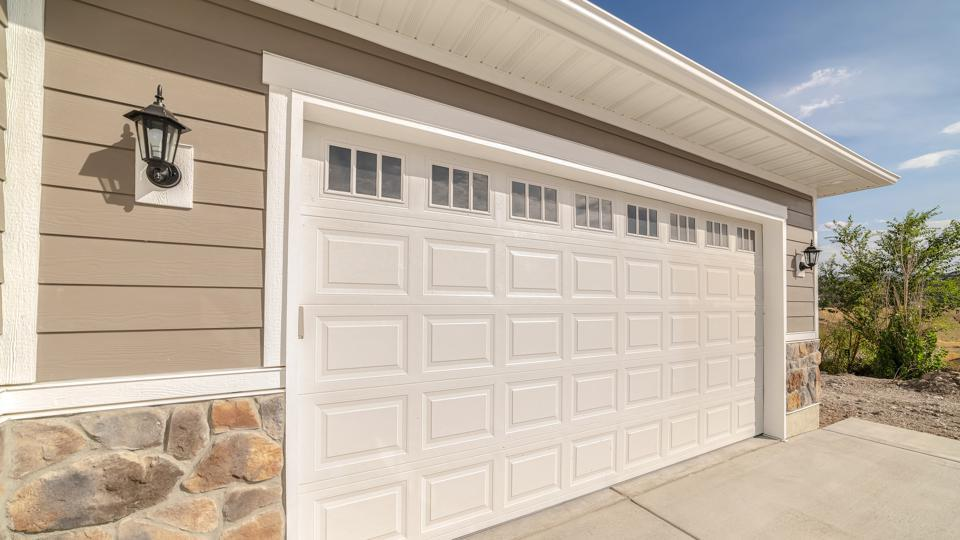
Overlay carriage house installation can completely transform your space by combining classic design with modern function. These upgrades enhance curb appeal, depth, and add character to your home. Whether your house is traditional or contemporary, this option blends beautifully while standing out. It adds lasting value and charm, making your home look more elegant and refined. This guide covers everything you need to get started, including planning, material selection, and a complete breakdown of the installation process. Whether you want to tackle it yourself or hire a pro, we make each step easy to understand. Start your journey toward a more beautiful and functional space with expert-backed guidance you can trust. Benefits of Overlay Carriage Houses Overlay carriage house installation adds both charm and value to your home. Here are the main benefits homeowners can enjoy when choosing this stylish upgrade: Boosts Curb Appeal Instantly Overlay carriage house doors give your home a classic, upgraded look that stands out and blends well with both modern and traditional architectural styles. Increases Property Value A carriage-style garage door makes your home look more polished, helping boost its overall value and attracting more attention from potential buyers. Custom Design Options These doors come in various finishes, hardware, and window styles. You can match the door perfectly with your home’s personal design theme. Extra Functionality Unlike plain garage doors, overlay models offer added features such as windows, storage space, and better design choices to fit your daily lifestyle needs. Improves Energy Efficiency Many overlay carriage doors include insulation and weather seals that help regulate indoor temperatures and cut down your monthly heating or cooling costs. Durable and Long-Lasting Built with strong materials like steel or composite wood, these garage doors are designed to withstand harsh outdoor weather conditions and last for a long time. Fits Any Home Style Whether your home is traditional or modern, there’s a perfect overlay design that blends in while adding a unique, attractive visual touch. Choosing an overlay carriage house installation is a smart move for homeowners who want better looks, function, and efficiency in one upgrade. It’s an investment that truly pays off. Key Features of Overlay Carriage Houses Overlay carriage house installation gives your home more than just good looks. Let’s check out the key features that make these garage doors worth the upgrade. 1. Custom Design Choices Overlay carriage-style garage doors are available in a variety of designs, colors, and textures, allowing you to match them to your home’s look and style perfectly. 2. Modern Locking Systems Advanced locking features give better home security. These garage doors often include heavy-duty locks or smart locks for added safety and peace of mind. 3. Automated Openers Many overlay carriage house doors support automation, allowing you to open or close your garage easily using a remote, smartphone, or smart home system. 4. Strong Build Quality They are made using steel, composite, or durable wood materials. These high-quality garage doors are designed to withstand the wear and tear of everyday use. 5. Weather-Resistant Materials Materials such as insulated steel or treated wood protect the door from moisture, sunlight, and wind, helping your garage door withstand any season. 6. Decorative Hardware Options You can add stylish hardware like handles, hinges, and straps. These details make the garage door look more classic and eye-catching without much effort. 7. Fits Any Home Design From modern homes to older builds, overlay carriage house garage doors can be tailored to blend in and still give your space a fresh update. Overlay carriage house installation offers strong, stylish, and secure features that cater to today’s home needs. It’s a smart way to get both looks and function in one upgrade. Planning Your Overlay Carriage House Installation Proper planning is crucial for a successful overlay carriage house installation. The first step involves assessing the available space and determining the size and style of the carriage house that best fits the property. Considerations should include the surrounding architecture, local zoning regulations, and personal preferences. Once the initial assessment is complete, it’s time to move on to design considerations. This includes selecting the type of doors, windows, and additional features you wish to incorporate. Working with a designer or using design software can help visualize the final result and make necessary adjustments before construction begins. Setting a clear budget is an important part of the planning process. It’s essential to account for all potential costs, including materials, labor, permits, and unforeseen expenses. A detailed budget helps avoid financial surprises and ensures the project stays on track from start to finish. Materials Needed for Overlay Carriage House Installation Choosing the right materials is key to a successful overlay carriage house installation. It affects the appearance, durability, and maintenance of the final design. Common options include: Choose materials that suit your local weather, personal style, and available budget. Partner with reliable suppliers to ensure the right match for your project. Additionally, select high-quality hardware to enhance the appearance, functionality, and security of your overlay carriage house. Step-by-Step Guide to Installing Overlay Carriage Houses Installing an overlay carriage house involves several steps, each requiring attention to detail and precision. Here’s a comprehensive guide to the installation process: Step 1. Preparation Clear the area where the carriage house will be installed. Ensure the foundation is level and any previous structures are removed or modified if necessary. Step 2. Framing Build the carriage house frame using the materials you’ve chosen for your project. This step includes taking precise measurements and trimming materials to match the design requirements. Step 3. Door Installation Install the doors carefully, making sure they are aligned properly and can open and close without issues. This step may involve installing tracks or hinges, depending on the chosen door style. Step 4. Adding Windows If windows are part of the design, they should be installed after the doors. Ensure they are tightly sealed to prevent any water from entering. Step 5. Finishing Touches Add any decorative elements, such as trim, hardware,
Master Linear Garage Opener Programming with These Simple Steps

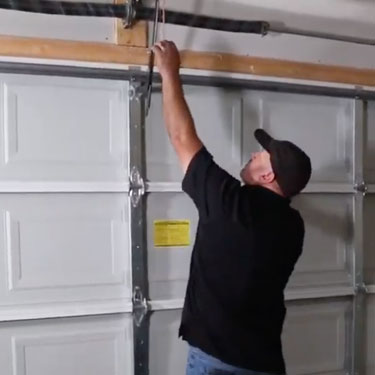
A reliable garage door opener makes daily life easier and more secure. If you own a Linear model, learning the process of Linear garage opener programming ensures your door opens and closes smoothly every time. Proper programming helps avoid issues, improves security, and keeps your garage system functioning exactly as it should. This detailed guide provides simple step-by-step instructions to help you complete the setup without confusion. With the right approach and accurate information, you can handle programming quickly and confidently. Follow this guide to achieve dependable garage door performance while saving time and avoiding unnecessary service calls. Understand Your Linear Garage Opener System Understanding how your Linear garage opener system works is the first step before programming it. These openers are known for their smooth performance and easy-to-use design. They usually include a motor unit, a remote control, a wall button, and safety sensors that all work together during operation. Most Linear garage openers follow a similar setup process. Locate the programming button on the motor unit and make sure your system is installed correctly. Before starting, check that the garage door is closed and the area is well-lit for a safe and hassle-free programming experience. Every part of the garage opener system plays a role in syncing the remote. The remote sends a signal to the receiver in the opener, allowing the door to move. Learning this connection helps you handle Linear garage opener programming confidently without missing important steps. Get Prepared: What You Need Before Programming Before starting the Linear garage opener programming process, getting everything ready will help things go smoothly. A little preparation can save time and prevent mistakes during setup. 1. Find the Instruction Manual Use the printed guide or download one based on your opener’s model number. This gives you accurate steps for your specific unit. 2. Have a Sturdy Ladder Most opener units are mounted on the ceiling, so you will need safe access to reach the programming button on the motor. 3. Check Your Remote Control Make sure the remote is working. Replace the batteries if the signal seems weak to avoid connection issues during the setup. 4. Clear Your Workspace Remove anything around the garage door area. A clean and safe space lets you move freely and focus on the task. 5. Inspect The Opener Unit Confirm the power is on and check the indicator lights. These signs tell you the system is ready for the programming steps ahead. Once you’re ready, programming will go smoothly. A little preparation helps prevent errors and keeps your Linear garage opener running properly. Step-by-Step Linear Garage Opener Programming Process Getting your Linear garage opener working right depends on following the correct steps. These simple actions help you complete the linear garage opener programming quickly and without issues. Step 1. Find the “Learn” or “Program” Button on the Opener Look for a button labeled “Learn” or “Program” near the LED light on the opener unit. This starts the programming process. Step 2. Press and Release the Programming Button Press the button once and let go. The LED light will blink, showing the opener is now ready to connect with your remote. Step 3. Press the Remote Button Within 30 Seconds After the opener light blinks, press the remote button you want to link. Do this within 30 seconds, or the system will exit programming mode. Step 4. Watch for a Flash or Click to Confirm If the opener light flashes again or you hear a soft click, that means your remote and opener are now successfully connected and ready. Step 5. Test the Remote to Make Sure It Works Press the same remote button to see if the door opens or closes. If it does not respond, repeat the steps and check the remote batteries. Step 6. Wait Between Button Presses During Setup Don’t rush the process. Allow a short pause between each step so the opener system has time to register each signal without confusion. Step 7. Avoid Pressing Multiple Buttons at Once Stick to one button at a time while programming. This keeps the signals clean and helps prevent errors during the syncing process. Once the remote is synced, your garage door should respond smoothly. Taking your time and following these steps will ensure a successful setup every time. Programming Multiple Remotes or Keypads Programming more than one remote or keypad is easy with the right steps. This part of linear garage opener programming helps families or shared spaces stay connected without hassle. 1. Program the First Remote as Usual Start by following the basic steps to sync your first remote. Press the Learn button, then the remote button, and wait for confirmation from the light. 2. Press the Learn Button Again to Add Another Device Go back to the opener unit and press the Learn button again. This prepares the system to store a second remote or wireless keypad. 3. Sync the Second Remote or Keypad Code Within 30 seconds, press the second remote’s button or type your keypad code. Then press Enter. The flashing light or click confirms it’s programmed. 4. Repeat for Any Extra Devices You Need You can repeat the process to add more remotes or keypads. Just press Learn again before syncing each one so nothing gets erased. 5. Clear All Devices If Needed To erase all saved codes, press and hold the Learn button for about 6 to 10 seconds until the LED turns off completely. This makes it easy to program different remotes and keypads for each family member. It’s a simple way to keep access flexible and secure for everyone. Troubleshooting Programming Issues Even if you follow the steps right, sometimes things don’t go as planned. These common problems can affect your garage opener setup and how it responds. Maintaining Your Linear Garage Opener Routine maintenance of your Linear opener helps it run better and last longer. These easy steps can prevent problems and make future programming much smoother. 1. Lubricate the Chain
How to Reattach Garage Door Cable: Expert Tips for Quick Repair
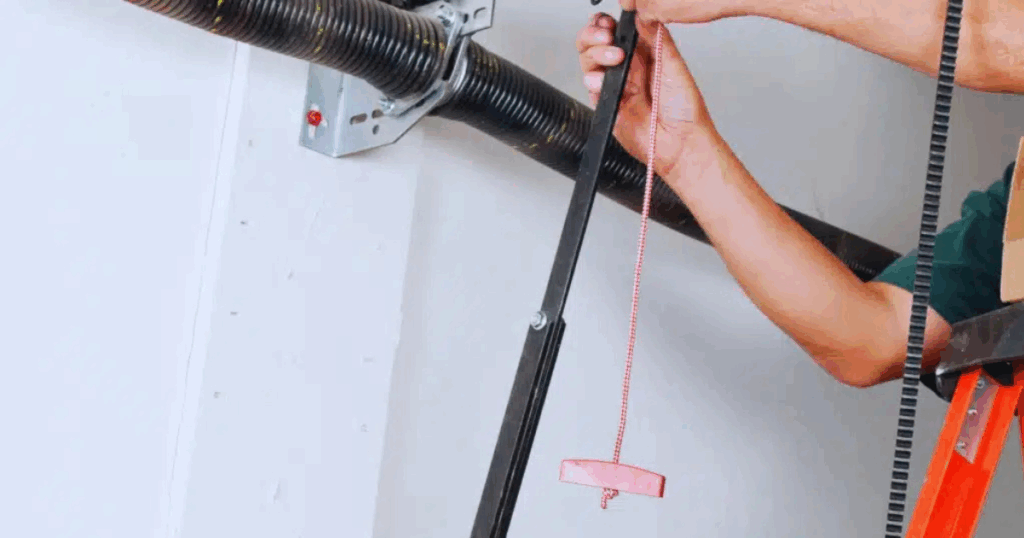
When you’re looking to learn how to reattach garage door cable, it’s crucial to approach the task with care and attention. Cables can become loose or disconnected due to wear, impact, or improper adjustments. By understanding the process, you can ensure safety and efficiency, preventing additional issues that could further damage the garage door system. Garage doors are vital for home security and daily convenience, so any malfunction can be a major disruption. A detached cable often indicates an underlying issue, but reattaching it correctly can restore the door’s smooth operation. With the right tools and following a detailed step-by-step process, you can confidently fix the problem and protect your home. Understanding Garage Door Cables Garage door cables are crucial components that help lift and lower the door smoothly. They work together with the springs to evenly distribute the door’s weight, ensuring smooth and efficient operation. Understanding their function can aid in diagnosing issues and implementing reattachments properly. These cables are typically made of strong, high-tensile steel, designed to withstand the door’s weight and the forces exerted during operation. They run through a system of pulleys and drums, connecting to the bottom brackets of the garage door. Knowing the layout and function of these cables is key to effective maintenance and repair. Wear and tear over time can lead to cable detachment or damage. Common signs of cable issues include uneven door operation, visible fraying, or a door that is difficult to open or close. Regular inspection can help identify potential problems early, reducing the risk of sudden failures. Common Reasons for Cable Detachment Several factors can cause garage door cables to detach. Understanding these causes can help in preventive maintenance and timely garage door repairs. Here are some common reasons: By identifying these causes, homeowners can implement measures to prevent detachment and ensure the longevity of their garage door cables. Safety Precautions Before Starting the Repair When handling garage door cables, safety should always be the highest priority. The tension in these cables can be dangerous, and proper precautions must be taken. Here are some essential safety tips: 1. Disconnect Power Be sure to disconnect the garage door opener from the power source before beginning the repair. This ensures the door won’t accidentally activate while you’re working, preventing unexpected movements. 2. Use Protective Gear Wear safety glasses and gloves during the repair. This protects you from potential injuries caused by snapping cables or falling debris that might occur. 3. Secure the Door Before beginning, make sure the garage door is fully closed and locked. This will keep it from moving unexpectedly, reducing the risk of injury. 4. Use Caution with Springs Garage door springs are tightly wound and can pose a serious risk if not handled properly. Handle them carefully and avoid unnecessary pressure to prevent injury or damage to the system. 5. Have a Partner If possible, have someone help you during the repair. A partner can assist with tools, support, and managing tasks, ensuring the repair goes smoothly and safely. By following these safety measures, the risk of injury can be significantly reduced, allowing for a safe and effective garage door repair process. Tools Required for Reattaching Garage Door Cables It’s essential to have the proper tools available to reattach garage door cables effectively. Here is a list of tools commonly needed for this task: Having these tools ready allows you to approach the repair with both confidence and accuracy. Step-by-Step Guide on How to Reattach Garage Door Cable Reattaching a garage door cable may seem tricky, but with the right steps, it can be done safely and effectively. Here’s an easy guide to ensure you complete the task correctly. Step 1. Identify the Problem Start by inspecting the garage door system to find where the cable has detached. Look for any visible damage, such as worn-out cables or broken pulleys, that may need attention. Step 2. Secure the Door Before you begin, make sure the door is fully closed and locked in place. Use clamps or locking pliers to secure the door, preventing any unexpected movement while you’re working. Step 3. Release Tension Release the tension in the springs carefully using a winding bar or similar tool. This step is crucial to avoid injury and ensure the system is safe to work with during the repair. Step 4. Reattach the Cable Guide the cable through the pulleys and firmly secure it to the bottom bracket. Make sure it’s seated properly in the drum, and ensure it’s tightly in place to avoid future issues. Step 5. Tighten and Test Once the cable is reattached, reapply tension to the springs and carefully test the door’s movement. Make sure the door moves smoothly and is properly balanced, which shows the cable has been installed correctly. Reattaching a garage door cable demands careful attention and patience to guarantee it operates safely and efficiently. By following this step-by-step guide on how to reattach garage door cable, you will have your garage door operating like new in no time. Troubleshooting Common Issues During Repair During the garage door repair process, you may encounter some common issues. Here are solutions to address these challenges: Tackling these problems quickly can help avoid additional damage and keep the garage door running smoothly. Preventative Maintenance Tips for Garage Door Cables Regular maintenance is key to keeping your garage door cables in top shape. Proper care can help extend their lifespan and prevent unexpected detachment. Here’s how you can maintain your garage door cables effectively. 1. Inspect Regularly Check cables for wear, fraying, or damage. Replace them immediately to prevent further damage and ensure your garage door system operates smoothly. 2. Lubricate Moving Parts Use silicone-based lubricant on pulleys, hinges, and springs. This reduces friction, prevents wear, and ensures smooth, quiet operation of your garage door. 3. Balance the Door Disconnect the opener and manually operate the door to check the balance. If it moves unevenly, it may need adjustment to avoid strain on the cables.
How to Insulate a Roll-Up Garage Door: Step-by-Step Guide

A roll-up garage door is durable and space-saving but often lacks proper insulation. This can cause heat loss in winter and excessive heat in summer. If your garage feels uncomfortable year-round, it is time to change. Discover how to insulate a roll-up garage door to improve comfort and save on energy costs. This detailed guide walks you through all the essential steps you should follow. We have you covered from insulation benefits to choosing the right materials and installing them correctly. Whether you want to reduce outside noise, protect against moisture, or lower energy bills, this guide will help. Learn how to insulate a roll-up garage door with simple and practical steps. Understanding Roll-Up Garage Doors Roll-up garage doors are a common choice for both homes and businesses due to their compact design and simple, convenient operation. These doors roll into a compact coil above the opening, which makes them great for tight areas. However, their thin metal slats offer little to no garage door insulation, causing heat loss and temperature swings. Unlike sectional doors, roll-up doors move more and flex often, making insulation harder to install. Because of this, using the right thermal barrier is very important. Choosing the wrong option can impact the way your door functions. Proper insulation helps reduce energy loss, blocks outdoor noise, and makes the garage more comfortable. Benefits of Insulating a Roll-Up Garage Door Adding insulation to a roll-up garage door is smart if you want better comfort and lower energy bills. It brings multiple benefits to your garage beyond just insulation. Energy Efficiency Adding insulation to your garage door helps prevent heat from escaping and keeps cooler air inside. This boosts energy efficiency and helps lower monthly heating and cooling costs. Temperature Control A properly insulated door keeps the cold out in winter and blocks heat during summer. This helps maintain a steady temperature inside and makes the garage a more comfortable space to use. Noise Reduction Garage door insulation reduces outside noise from traffic or neighbors, creating a quieter space, perfect for a workspace or gym. Moisture Control Insulation acts like a moisture barrier by preventing condensation buildup. This protects tools, boxes, and other stored items from mold, rust, and water damage. Learning how to insulate a roll-up garage door is a smart way to save money and protect your space. It also adds comfort and year-round performance. Choosing the Right Insulation Materials for Roll-Up Garage Doors Picking the best insulation material for your roll-up garage door can make a big difference in its performance. Some options are flexible and easy to install, while others offer more thermal performance. Insulation Type Key Benefits Potential Drawbacks Best For Reflective Foil Insulation Lightweight, flexible, easy to cut and install. Reflects heat well. Lower R-value compared to foam options. Hot climates and easy DIY projects Foam Board Insulation High R-value, strong thermal barrier, improves energy efficiency. It may be too thick or stiff for roll-up doors. Maximum insulation, colder climates Spray Foam Insulation Fills gaps tightly and acts as an air and moisture barrier. It can block door movement if applied too heavily. Sealing leaks and moisture control Always check the R-value, thickness, and if the insulation fits your roll-up door’s movement. Choosing the proper garage door insulation improves comfort, saves energy, and helps you correctly insulate a roll-up garage door. Tools and Materials to Insulate a Roll-Up Garage Door To insulate a roll-up garage door, gather some basic tools and materials to make the job easier and safer. These include: Tools Materials Ensure everything you use works well with your specific garage door material and holds up in local weather. Using the right tools and materials ensures the insulation sticks properly and lasts longer. Step-by-Step Guide to Insulate a Roll-Up Garage Door Insulating a roll-up garage door is simple if you follow the proper steps. This guide shows how to insulate a roll-up garage door correctly for lasting comfort and energy savings. Step 1: Preparation Clean the garage door using mild soap and water to remove dust, dirt, or grease. Be sure the surface is fully dry before starting the next step. Measure each panel carefully to ensure the insulation fits just right. Step 2: Cutting the Insulation Use your measurements to cut each insulation piece carefully. Keep edges straight for a clean fit. Reflective foil insulation is easiest to trim and install, making it an excellent choice for roll-up garage door insulation projects. Step 3: Applying Adhesive Choose the right adhesive for your insulation type. Spray adhesive is best for foil, while construction glue is needed for foam boards. Apply the adhesive in a smooth, even layer to prevent lumps and help it stick firmly to the surface of the garage door panels. Step 4: Installing Insulation Panels Place the cut insulation panels onto each slat or section of the door. Push down securely and keep it in place for a few seconds. Make sure each piece sticks well and lines up without wrinkles or gaps. Step 5: Sealing Edges and Joints Seal the edges and seams using foil or duct tape. This blocks air leaks and moisture. A solid seal keeps your insulation working well and helps the garage stay warmer in winter and cooler in summer. Step 6: Testing Door Operation Open and close the garage door slowly to check for any snagging or resistance. If needed, trim or adjust the insulation so the door works smoothly. Proper movement keeps your door in good shape and prevents future issues. Maintenance Tips to Keep Your Roll-Up Garage Door Insulation Effective Even the best garage door insulation needs care to stay effective. Regular maintenance helps you get the most comfort, energy savings, and performance over time. 1. Inspect for Loose or Damaged Sections Check the insulation for peeling, sagging, or loose spots every few months. Fix these early to keep your garage door insulation working as it should. 2. Clean the Surface Gently Gently clean the surface using a soft cloth
Easy Way to Replace Garage Door Bottom Seal: A Comprehensive Guide

A damaged garage door seal might seem like a small issue, but it can let in water, dirt, and pests. This can cause expensive problems later on. If you’re searching for the easy way to replace garage door bottom seal, you’ve found the right guide. With the right tools, this task is simple and can protect your garage for years. This full guide shows you all the important stuff you need to know. It explains why garage door seals matter and gives you step-by-step instructions for replacing them. Whether you’re new to DIY or already have experience, our tips will help you succeed. Don’t let a worn-out seal ruin your garage. Get started today to keep your garage clean and safe. Why the Garage Door Bottom Seal Matters A garage door bottom seal does more than just sit at the base. It stops cold air, water, dirt, and bugs from getting into your garage. This weather seal adds garage door insulation, keeping your space cleaner and more comfortable. Replacing it is one of the easiest ways to boost garage protection without spending a lot. Over time, the seal can flatten, crack, or fall apart. If you see light coming in or feel a draft, that’s a clear sign it needs replacing. Swapping out an old seal helps keep your garage dry and energy bills low. A fresh seal improves comfort and keeps your stuff safe year-round. Tools and Materials Needed for Replacement Before you begin, check that you have the right tools and materials. It will help you work faster and make the job go more smoothly. Having the right gear also helps prevent damage and ensures a clean finish. Tools You’ll Need Materials You’ll Need Identifying the Right Type of Bottom Seal for Your Garage Door Choosing the right bottom seal is important if you want to block out drafts, water, and bugs. Different garage door seal types fit different track styles, so choosing the right one helps avoid gaps and sealing issues. Seal Type Description Best For Track Compatibility T-type It has a “T” shape and fits into one straight slot. Standard flat garage floors. T-shaped retainer track U-type Forms a “U” shape when installed. Common for residential garage doors. U-shaped channel track Bead-end Has round ends that snap into circular slots. Metal or aluminum garage doors. Beaded retainer track Bulb-type Round, flexible bulb shape that compresses easily. Uneven or sloped garage floors. Wide bottom track or adjustable channels Always check the retainer track at the bottom of your garage door before buying. If unsure, use your old bottom weather seal as a guide or refer to your garage door’s manual. Step-by-Step Guide: Easy Way to Replace Garage Door Bottom Seal Changing your garage door bottom seal is a simple way to keep out cold air, water, and bugs. This simple guide shows how to do it without any stress. 1. Safety First Unplug your garage door opener to avoid accidents. Manually lift the door and prop it open securely. Safety matters when working around heavy doors and garage door weather stripping. 2. Remove the Old Seal Take a flathead screwdriver and gently pry up one end of the old seal. Slowly pull it out to avoid bending or damaging the metal track holding your bottom garage door seal. 3. Clean the Retainer Track Wipe off dust, old seal pieces, and grime from the track. Spray a little soapy water or silicone to make sliding the new garage insulation strip much easier. 4. Measure and Cut the New Seal Use a tape measure to find the exact width of your new garage door. Then, cut the new seal with a utility knife so it fits just right. 5. Install the New Seal Lightly spray lubricant on the track again if needed. Slide the new seal in slowly and evenly. Make sure it stays straight and does not bunch up during installation. 6. Test the Installation Close the door and check for gaps or light shining through. If you see any, adjust the seal. Your bottom garage door seal replacement is now complete and effective. Tips for a Smooth Garage Door Bottom Seal Replacement Process Want to make your garage door seal installation easy and stress-free? These simple tips are part of the easy way to replace garage door bottom seal and help you avoid common mistakes for a better, longer-lasting seal. 1. Use Lubrication Apply soapy water or a bit of silicone spray inside the track. This makes sliding the garage weather seal smooth and prevents it from getting stuck or torn. 2. Don’t Stretch the Seal Don’t pull or stretch the bottom door seal when putting it on. Stretching can make it shrink later, which causes gaps that let in air and pests. 3. Work with a Partner Having someone help can make a big difference. One person feeds the seal while the other gently guides it into the track for faster and straighter installation. Common Mistakes to Avoid in Replacing Garage Door Bottom Seal Replacing your garage door bottom seal sounds easy, but one small mistake can ruin the job. Avoid these common errors for a smooth and weatherproof garage seal installation. Maintenance Tips to Extend Seal Lifespan Now that you’ve finished the easy way to replace garage door bottom seal, it’s time to make it last. A few simple care tips keep your rubber weather seal strong and working well. 1. Check Every 6 Months Check your garage door seal twice a year to see if there are any cracks, spaces, or if it feels hard. Catching early signs of wear keeps your garage door seal maintenance quick and easy. 2. Clean the Seal Use mild soap and warm water to wipe down the rubber seal. This removes dirt buildup and helps your bottom seal stay soft and flexible over time. 3. Avoid Chemicals Stay away from harsh cleaning products. Strong chemicals can dry out or crack the rubber, which shortens the life of
Black Garage Doors with Windows: A Stylish & Practical 2025 Upgrade

Black garage doors with windows provide an ideal combination of striking design and practical use, making them a highly sought-after home improvement in 2025. They deliver a sleek, contemporary appearance, allowing natural light to enter while maintaining your privacy. Their dark color makes a strong design statement that stands out and matches many home styles. This choice is smart for homeowners wanting curb appeal with valuable benefits. More than look, black garage doors with windows are built to stand the test of time. They help with energy savings, offer better security, and need little upkeep. Suppose you are planning an upgrade or need expert service. Alpha Garage Doors is your reliable choice for expert garage door repairs if that’s the case. Choose a garage door that adds beauty and function to your home, and enjoy a simple way to boost its value. Why Black Garage Doors with Windows Are Trending in 2025 Black garage doors with windows are trending in 2025 because they offer a bold and stylish look that fits many modern homes. Their deep color adds contrast and boosts curb appeal, helping any home stand out. More homeowners are choosing darker tones for a high-end appearance that still feels timeless and clean. These garage doors bring both beauty and function to any exterior design. Another reason for their rising popularity is how well they match different house styles. Black works great with white, gray, wood, or stone finishes, giving you more design freedom. The windows are also highly customizable, letting you pick the layout and shape that best fits your home. For a smart mix of design and usefulness, black garage doors with windows are the top choice this year. Key Benefits of Selecting Black Garage Doors With Windows Black garage doors with windows are an excellent option for homeowners seeking a blend of style and practicality. These doors enhance your garage with a touch of modern elegance, giving your home a bold and refreshed appearance. Natural Light The windows allow natural light to brighten your garage, reducing the need to switch on the lights. It makes the space brighter and more comfortable during the day. Keeps Your Privacy Frosted or tinted glass lets light in but blocks people from seeing inside. You can choose how clear or private you want it. Increases Home Value These stylish doors improve curb appeal and can make your home more attractive to future buyers. Strong Security The windows are made with tempered or double-paned glass that’s harder to break, helping protect your garage. Low Maintenance Powder-coated black finishes resist peeling, scratches, and fading, so the doors stay bold and clean with less upkeep. Black garage doors with windows offer beauty, privacy, and lasting value in one upgrade. They’re an easy way to boost curb appeal and improve your garage space. Popular Styles and Window Configurations to Consider Black garage doors with windows come in many styles, making it easy to match your home’s look. Whether your home is modern or traditional, there’s a design that adds beauty and function. Full-View Aluminum Doors These feature wide glass panels encased in a black frame, offering a chic and contemporary style. They let in the most light and are great for contemporary homes. Carriage House Style A classic design with raised panels and top windows. Select rectangular or arched glass for a timeless, traditional appearance. Vertical or Asymmetrical Window Layouts Perfect for modern or custom homes, these unique window patterns add style and stand out from the usual designs. Custom Window Shapes Choose from square, rectangular, or arched shapes to match your home’s design. Glass Options Pick clear, tinted, frosted, or decorative glass, depending on how much light and privacy you want. With so many styles and window layouts to choose from, black garage doors with windows can perfectly fit any home. They offer a mix of good looks, light, and privacy. Best Materials for Black Garage Doors with Windows When selecting black garage doors with windows, ensure the material is durable and complements the overall style of your home. The right material will fit your needs, budget, and local climate while enhancing your home’s exterior. Selecting the best material for your black garage doors with windows ensures they will last and keep their appeal. Find what works for your home by thinking about your needs and tastes. Insulation, Energy Efficiency, and Light Control Black garage doors with windows enhance your home’s appearance and improve insulation and energy efficiency. Insulated doors keep your garage cozy in winter and cool in summer all year round. This results in better comfort and lower energy costs, especially if your garage is connected to your home. Windows play a role in temperature control, with double-pane or insulated glass offering better thermal performance than single-pane options. Tinted glass blocks heat, glare, and sunlight, so your garage stays cooler and your things stay safe. Frosted glass or internal blinds can add privacy and help control light levels. Matching the Garage Door to Your Home’s Architecture Your garage door should match your home’s design, and black garage doors with windows do just that. They complement various architectural styles, adding balance and style. Modern homes often pair well with full-view or flat-panel doors, where the black color contrasts beautifully with lighter exteriors, and the windows add a sleek touch. For Craftsman and farmhouse homes, black garage doors with traditional panel designs and upper window rows fit perfectly. The windows give a modern touch while maintaining the classic charm. Black doors also create a striking contrast with white siding, stone, and wood, enhancing the overall depth and warmth of your home’s exterior. Maintenance Tips for Longevity and Performance Maintaining your black garage doors with windows is simple and helps keep them looking great for years. By following a few easy steps, you can extend their lifespan and ensure smooth performance. Regular maintenance keeps your black garage doors and windows functioning well and looking sharp. With just a little care, you can ensure
Understanding the Importance of Dock Levelers: What is a Dock Leveler and How Does it Work?
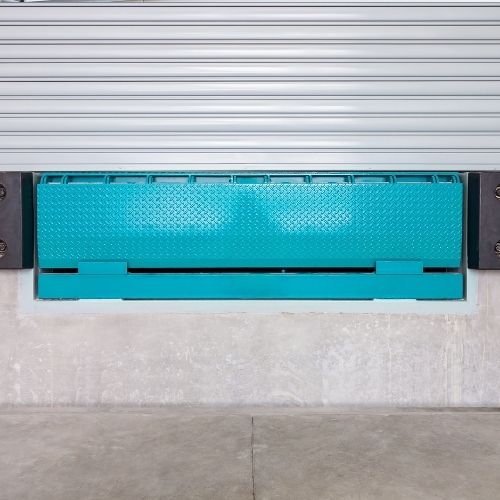
Dock levelers are an essential piece of equipment in the logistics and warehousing industry, playing a crucial role in the efficient loading and unloading of goods. These innovative devices bridge the gap between a truck’s trailer and the warehouse floor, ensuring a seamless and safe transfer of materials. Understanding the importance of dock levelers is crucial for businesses that rely on smooth supply chain operations. In this comprehensive article, we’ll delve into the world of dock levelers, exploring their purpose, types, and the mechanics behind their functionality. By the end of this guide, you’ll have a thorough understanding of why dock levelers are indispensable in modern logistics and how they can benefit your business. Importance of Dock Levelers in Logistics and Warehousing Dock levelers are the unsung heroes of the logistics industry, facilitating the smooth flow of goods and materials between trucks and warehouses. Without these essential devices, the loading and unloading process would be fraught with challenges, leading to delays, inefficiencies, and potential safety hazards. The importance of dock levelers in logistics and warehousing operations cannot be overstated. They play a crucial role in: By understanding the importance of dock levelers, you can ensure that your logistics and warehousing operations run smoothly, efficiently, and safely. What is a Dock Leveler? A dock leveler is a mechanical device installed at the loading dock of a warehouse or distribution center. Its primary function is to bridge the gap between the warehouse floor and the bed of a truck or trailer, allowing for the seamless movement of materials, equipment, and personnel during the loading and unloading process. Dock levelers come in various sizes and capacities, designed to accommodate different types of trucks and trailers. They are typically made of sturdy steel construction and feature a hinged platform that can be raised, lowered, or extended to match the height and position of the truck’s trailer. Types of Dock Levelers There are several different types of dock levelers available, each with its own unique features and benefits. The most common types include: Depending on your specific requirements, such as the size and type of trucks you typically handle, the volume of traffic, and the available space in your loading dock area, you can choose the dock leveler that best suits your needs. How Does a Dock Leveler Work? Dock levelers are designed to bridge the gap between the warehouse floor and the truck’s trailer, ensuring a smooth and safe transition for materials, equipment, and personnel. Here’s a step-by-step overview of how a dock leveler works: The specific mechanics of how a dock leveler works may vary slightly depending on the type of dock leveler (mechanical, hydraulic, or air-powered), but the underlying principle remains the same: to provide a stable and secure connection between the warehouse and the truck’s trailer, enabling efficient and safe material handling. Advantages of Using a Dock Leveler Implementing a dock leveler in your logistics or warehousing operations can provide numerous benefits, including: By leveraging the advantages of dock levelers, you can enhance the safety, efficiency, and productivity of your logistics and warehousing operations, ultimately improving your overall business performance. Common Issues and Maintenance of Dock Levelers Like any piece of equipment, dock levelers can experience various issues and require regular maintenance to ensure their optimal performance and longevity. Some common issues and maintenance considerations include: To address these issues and ensure the long-term reliability of your dock levelers, it’s essential to implement a comprehensive maintenance program that includes: By proactively maintaining your dock levelers and addressing any issues that arise, you can ensure the smooth and reliable operation of your loading and unloading processes, ultimately supporting the overall efficiency and productivity of your logistics and warehousing operations. Choosing the Right Dock Leveler for Your Business Selecting the appropriate dock leveler for your business involves considering a variety of factors to ensure that the chosen solution meets your specific needs and requirements. Some key considerations when choosing a dock leveler include: By carefully evaluating these factors and consulting with experienced dock leveler suppliers or installation professionals, you can ensure that you select the right dock leveler solution for your business, optimizing your loading and unloading operations for maximum efficiency and cost-effectiveness. Installation and Safety Considerations for Dock Levelers Proper installation and ongoing safety considerations are crucial for ensuring the reliable and safe operation of your dock levelers. Here are some key factors to keep in mind: It’s recommended to have your dock levelers installed by experienced and certified professionals who can ensure the proper integration with your existing loading dock infrastructure. For powered dock levelers, it’s essential to have the electrical and mechanical systems inspected and tested by qualified technicians to verify their safe and proper functioning. Dock levelers should be installed and operated in compliance with relevant safety standards and regulations, such as those set by the Occupational Safety and Health Administration (OSHA) or the American National Standards Institute (ANSI). Ensure that your dock personnel receive comprehensive training on the proper use and maintenance of the dock levelers, including safety protocols and emergency procedures. Implement a regular inspection and maintenance schedule to identify and address any issues or wear and tear on the dock levelers, ensuring their continued safe and reliable operation. Clearly mark the dock leveler’s operating area and provide visual cues or warnings to help prevent accidents and ensure the safety of workers and equipment. Consider incorporating additional safety features, such as vehicle restraint systems or dock safety lights, to further enhance the overall safety of your loading and unloading operations. Develop and regularly review emergency response plans to address potential dock leveler malfunctions or other loading dock emergencies, ensuring the safety of your personnel and the protection of your assets. By prioritizing proper installation, ongoing maintenance, and a strong safety-first approach, you can maximize the performance and longevity of your dock levelers while maintaining a safe and efficient loading and unloading environment for your business. FAQs What is a dock leveler used for? A dock leveler
How Much Does a New Garage Door Cost? | Price Guide in Broomfield, CO
Get an instant estimate on the cost of a new garage door. Explore Broomfield, CO options, pricing, and installation fees to fit your budget. If you’re considering upgrading your home’s security, installing a garage door keypad is an affordable and convenient solution. These keypads offer keyless entry, removing the hassle of searching for remotes or keys while providing secure access to your garage. Whether you’re looking for basic functionality or advanced features, there’s an option that fits your needs. This blog will guide you through some of the best garage door keypad models on the market. We’ll cover various features, from budget-friendly designs to smart technology that connects with your smartphone. Additionally, you’ll learn how these systems can enhance both convenience and safety for your home. Keep reading to discover the right garage door keypad for your home, and if you’re also considering the new garage door cost, this guide can help you make informed decisions for both purchases! Average Cost of a New Garage Door On average, the cost of a new garage door in 2024 ranges from $500 to $2,500, depending on factors like material and design. Most homeowners spend between $1,200 and $1,800, typically including installation. While more basic models start around $500, custom or premium doors can easily exceed $3,000. Investing in a quality garage door can enhance your home’s value, security, and energy efficiency. A new garage door doesn’t just add curb appeal; it also plays a crucial role in protecting your home from the elements, securing your belongings, and providing insulation. It’s an investment that not only upgrades the look of your home but also adds to its long-term value by improving functionality. Factors That Influence Garage Door Costs Several key elements affect the total cost of a garage door, including the type of door, the material, and the size. Let’s dive deeper into how each of these factors can influence your budget. Cost Based on the Type of Garage Door The type of garage door you select plays a significant role in the overall cost. Each type offers different advantages in terms of style, functionality, and durability. Here are the most common types: Each type of door has its own benefits. Sectional and roll-up doors are ideal for homeowners focused on efficiency and space-saving, while tilt-up and custom doors are better for those who want a distinct look and are willing to invest in aesthetics. Cost Based on Garage Door Materials The material of your new garage door can dramatically affect both the upfront cost and long-term maintenance. Here’s a breakdown of popular materials and their typical price ranges: Cost Based on Garage Door Size Garage door sizes also play a big role in determining the cost. Standard sizes are more affordable, while custom or oversized doors will increase your budget: Custom sizes, like those needed for RV garages or other large vehicles, will naturally add to the cost, sometimes significantly. Larger doors require more materials, heavier-duty hardware, and potentially more labor for installation, which drives up the total expense. Other Factors That Add to the Cost Several other factors can add to the total cost of a new garage door, including additional features and upgrades: Repairing vs. Replacing Your Garage Door If your garage door shows signs of wear, you can repair it rather than replace it entirely. However, there are times when replacement is the better (or only) option. Should You DIY or Hire a Pro for Garage Door Installation? Garage door installation is a complex task, and while doing it yourself might save some money, there are potential risks involved. Let’s compare the options: Tips for Hiring a Garage Door Installer Finding the right contractor for your garage door installation can make a big difference in terms of quality and price. Here’s what to keep in mind: How to Cut Costs on a New Garage Door Garage doors can be expensive, but there are ways to reduce the overall cost without sacrificing quality: Selecting the Right Garage Door for Your Home Choosing the right garage door is not just about budget; you’ll also want to consider aesthetics, security, and functionality. For instance, an insulated door may provide better energy efficiency if you live in an area with extreme weather. Additionally, think about how the door will complement the style of your home—whether you’re going for modern, traditional, or something custom. Frequently Asked Questions about New Garage Door Cost Why are garage doors so expensive? Garage doors can be costly due to the materials used, such as steel, wood, or fiberglass, which impact durability and aesthetics. Insulation, custom designs, and high-quality hardware also add to the price. Additionally, professional installation and labor costs contribute to the overall expense, especially for larger or more complex installations. How long does it take a professional to install a garage door? A professional can install a garage door in about 3 to 6 hours, depending on the complexity of the job and the type of door. This time frame includes removing the old door, installing the new door, and setting up the opener if required. How long is a standard garage door? A standard single-car garage door is typically 7 feet tall and 9 feet wide. The standard width for a double-car garage is 16 feet. Custom sizes are available for larger vehicles or unique garage configurations. How many meters is a garage door? A single garage door is typically 2.74 meters (9 feet) wide and 2.13 meters (7 feet) tall, and double garage doors are usually 4.88 meters (16 feet) wide. However, these sizes can vary depending on regional standards and custom requirements. What is the minimum distance between garage doors? The minimum distance between two garage doors should be at least 1 to 2 feet. This spacing allows for structural support between the doors and makes it easier to access each door without interference. Conclusion So, what’s the bottom line of the new garage door cost? On average, garage doors range from
Best Garage Door Keypad in Broomfield, CO

Keyless garage door keypads provide secure and convenient access. Find the best Broomfield, CO models for your home or office. A garage door keypad might be the perfect solution if you’re looking for a more convenient way to access your garage. These keypads offer a secure, keyless entry method that eliminates the need for remotes or keys. Simply enter a code, and you can access your garage effortlessly. Whether you want something basic or more advanced, there are plenty of options to choose from. In this blog, we’ll explore some of the best garage door keypad models available, from budget-friendly choices to high-tech options with smart features. Each option is designed to improve your home’s convenience and security. Keep reading to find out which garage door keypad best suits your needs, ensuring easy and reliable access for you and your family. Top Pick: Best All-Around Garage Door Keypad Genie Universal Wireless Entry Keypad GUK-R For overall functionality, ease of use, and broad compatibility, the Genie Universal Wireless Entry Keypad GUK-R is hard to beat. It’s designed to work with most major garage door opener brands and is perfect for homeowners looking for an easy-to-install, reliable solution. Whether upgrading an older system or installing a new garage door keypad for the first time, this device covers all the basics. Its straightforward programming and user-friendly interface make it ideal even for those who aren’t particularly tech-savvy. Additionally, Genie is a trusted name in the garage door industry, so you can expect long-lasting durability. The keypad has a flip-up cover to protect it from the elements, making it reliable in various climates. This keypad is also known for its fast response time, which allows you to open the door immediately after entering your code. Key Features Advantages Disadvantages Best Budget-Friendly Garage Door Keypad X X-House Universal Garage Door Keypad If you’re looking for a budget-friendly garage door keypad without sacrificing quality, the X X-House Universal Garage Door Keypad is a fantastic choice. It’s compatible with major garage door opener brands and offers solid performance at a very affordable price. This keypad provides everything you need for simple, reliable access without the premium price tag. Although this model lacks the bells and whistles of high-end keypads, it provides dependable access. It’s great for homeowners who need a functional, no-frills solution to access their garage. The keypad is also built with a weather-resistant design, meaning it can last through rainy and sunny conditions. Key Features Advantages Disadvantages Best for Homes with Multiple Garage Doors Marantec Wireless Keyless Entry System The Marantec Wireless Keyless Entry System is a great solution for homes with more than one garage door. This versatile keypad allows you to control up to four separate garage doors from one device, making it ideal for families with multiple garages or larger properties. Its sleek design offers both style and functionality, and the keypad itself is known for durability and long-term performance. This keypad is especially useful if you have a larger home with detached garages or need to operate different doors independently. You don’t need multiple remotes or keypads for each garage; the Marantec system simplifies access for multiple doors in a single device. Key Features Advantages Disadvantages Best for Enhanced Security LiftMaster 878MAX Security+ Garage Door Keypad For homeowners who prioritize security, the LiftMaster 878MAX Security+ Garage Door Keypad offers peace of mind with advanced safety features. This model is designed with Security+ 2.0 technology, which ensures the signal sent to your garage door opener is secure and virtually impossible to hack. It’s an excellent choice for those looking for extra protection, especially in areas prone to security concerns. LiftMaster is known for producing some of the most secure garage door products. The 878MAX offers enhanced encryption and peace of mind, knowing that each entry is secure. Key Features Advantages Disadvantages Best for Weather Resistance Overhead Door OKP-BX Universal Wireless Keypad For those who live in regions with extreme weather conditions, the Overhead Door OKP-BX Universal Wireless Keypad is a great option. Built with durability in mind, this keypad is designed to withstand everything from heavy rains to freezing temperatures and scorching heat. Its rugged construction ensures you can rely on it year-round, regardless of climate. This keypad is ideal for homes in areas that experience severe weather changes, as it offers a robust and weatherproof solution that lasts. Whether you live in a coastal region with salty air or a snowy environment where freezing temperatures are a constant concern, this keypad will continue to function without issues. Key Features Advantages Disadvantages Frequently Asked Questions about Garage Door Keypad Do garage doors come with keypads? Many modern garage door openers include keypads, but not all do. If your opener doesn’t, keypads can be purchased separately and installed to provide secure, keyless entry. They are a convenient addition for families or frequent users. Are keypads safer than keys? Keypads are often considered safer than traditional keys because they eliminate the risk of losing or copying keys. Additionally, keypad codes can be changed easily, providing more security flexibility. With rolling code technology, modern keypads are highly secure against hacking. How do garage door keypads work? When you enter a programmed code, garage door keypads transmit a signal to the garage door opener. This signal triggers the opener to either open or close the garage door. Modern keypads use encrypted signals to enhance security and prevent code theft. Can I make my existing garage door smart? Yes, you can upgrade most existing garage doors with smart technology. Smart garage door openers or add-on kits allow you to control the door remotely using a smartphone app. Some systems also integrate with home automation platforms for added convenience. Can someone open a garage door without a key? Yes, someone could open a garage door without a key using the keypad, remote control, or emergency release lever. This is why keeping the door secure is important by using rolling code technology and periodically updating your access codes.
Top Garage Door Maintenance Tips for Long-Lasting Performance in Broomfield, CO
Discover how to perform routine garage door maintenance. Our guide covers easy steps to keep your Broomfield, CO, garage door functioning well. When was the last time you thought about garage door maintenance? Most homeowners tend to overlook this crucial part of their home until something goes wrong. But like your car or HVAC system, your garage door needs regular care to function smoothly and safely. By sticking to a consistent garage door maintenance routine, you can extend the life of your door, avoid costly repairs, and keep everything operating quietly and efficiently. Below, we’ll walk you through the essential steps for maintaining your new garage door, from limiting its use to testing the door’s balance. Let’s get started on how to keep your garage door working like new for years to come! Limit Use Your garage door is not just another entryway; it’s a hefty, complex system made of moving parts that are subject to wear and tear every time it opens and closes. One of the simplest yet often overlooked ways to prolong the life of your garage door is to limit how frequently you use it. If you tend to use the garage door as your primary entrance or exit, consider alternatives, such as the main house door. Why is this important? Constant opening and closing place strain on the door’s springs, rollers, and tracks. Over time, this can lead to quicker wear and the need for repairs. Every time your door opens, it performs a significant lifting operation that involves all its components. Therefore, by reducing the number of cycles (open-close operations), you can greatly extend the longevity of these parts. Additionally, most automatic garage door openers are rated for a certain number of cycles. Using the garage door as a primary entrance and exit could cause you to hit this limit faster than you think. Make it a habit to reserve the garage door for vehicles and larger items, and opt for side doors when just entering the home on foot. This small change could add years to the life of your garage door system. Schedule Inspections Garage door maintenance isn’t just about quick fixes; it’s also about being proactive. Scheduling regular inspections can help catch minor issues before they become significant (and expensive) problems. Aim to give your new garage door a good look over at least twice a year—spring and fall are great times, as part of your seasonal home maintenance routine. During an inspection, look for the following: Clear Tracks and Tighten Hardware Ever wonder why your garage door sounds like it’s struggling to open or close? Sometimes, it’s not the motor but debris in the tracks. One of the most manageable garage door maintenance tasks you can do is regularly clearing out the tracks. Over time, dirt, leaves, and even small rocks can collect in the tracks, making it harder for the door to slide smoothly. Simply grab a cloth or a brush and clear out the tracks. For tougher grime, a bit of soapy water can do wonders. However, avoid using lubricants on the tracks, which can attract more dirt and gunk. While you’re at it, go ahead and tighten the hardware. Garage doors go through a lot of motion and vibration, and over time, bolts, screws, and brackets can loosen. Use a socket wrench to tighten everything up and ensure your door stays secure. Why You Should Avoid DIY Track Adjustments If you notice that your tracks are misaligned, resist the urge to make large adjustments yourself. If not corrected properly, misaligned tracks can cause significant damage to the garage door system. Incorrect adjustments can often exacerbate the issue, causing the door to come off the tracks. It’s best to call a professional if you’re dealing with a track issue beyond basic cleaning. Lubricate the Moving Parts One of the most effective garage door maintenance tips is also one of the simplest: lubrication. Properly lubricating the moving parts of your garage door can prevent grinding noises, reduce wear and tear, and extend the life of your system. Here’s what you should lubricate: Lubricating your garage door components every six months will keep your door gliding up and down quietly and efficiently. Don’t Forget the Rollers Rollers are the unsung heroes of your garage door system. They guide the door up and down the tracks, and without proper care, they can wear out quickly. Lubricating the rollers prevents them from grinding, but if your rollers are worn out, you may need to replace them. Worn-out rollers can lead to misaligned tracks, increased noise, and even safety hazards. Test the Door Balance Did you know that an unbalanced garage door puts unnecessary strain on the opener? Testing the balance of your garage door is an essential maintenance task that often needs to be noticed. If your door is not balanced correctly, the motor will have to work harder, which could lead to premature failure. To check the balance: If the door is unbalanced, it’s often due to spring tension. You should not tackle this on your own—garage door springs are under a lot of pressure and can be dangerous to adjust. Call a professional to inspect and adjust the springs if you notice any imbalance. Test the Auto-Reverse Safety Feature The auto-reverse feature on your garage door is a critical safety mechanism designed to prevent accidents. This system automatically reverses the door if it detects something in its path while closing. This feature must work properly, especially if you have children or pets. To test the auto-reverse: Many modern garage doors also have photoelectric sensors that detect motion near the bottom of the door. Test these by waving an object in front of the sensors while the door is closing; the door should immediately reverse direction. If it doesn’t, clean the sensors and realign them, if necessary. Replace Weatherstripping The weatherstripping on your garage door plays a dual role: it helps to keep your garage insulated and prevents dirt, pests,